Scaffolding your AWS single page application infrastructure with CDK
Tags: aws cdk static-site react angular vue cloud-development-kit infrastructure-as-code spa single-page-applicationMany projects at Mechanical Rock involve the creation of single page applications (SPAs) so it often helps to have a simple, repeatable process for quickly scaffolding one. The AWS Cloud Development Kit (CDK) is a relatively new framework for defining your cloud infrastructure as code to be provisioned with CloudFormation. CDK allows developers of SPAs to use the tools they are already familiar with, in this case TypeScript (or JavaScript), to define a template for their infrastructure that can be reused from one project to the next.
In this post I will detail the process from creating an S3 bucket to host our sites assets through to provisioning certificates to enable HTTPS on our domain and everything in between using CDK. I do assume a some amount of familiarity with CDK, that you have gone through and completed the CDK setup as detailed in the AWS Documentation and that you have a SPA ready to deploy along with a custom domain name registered through AWS Route 53.
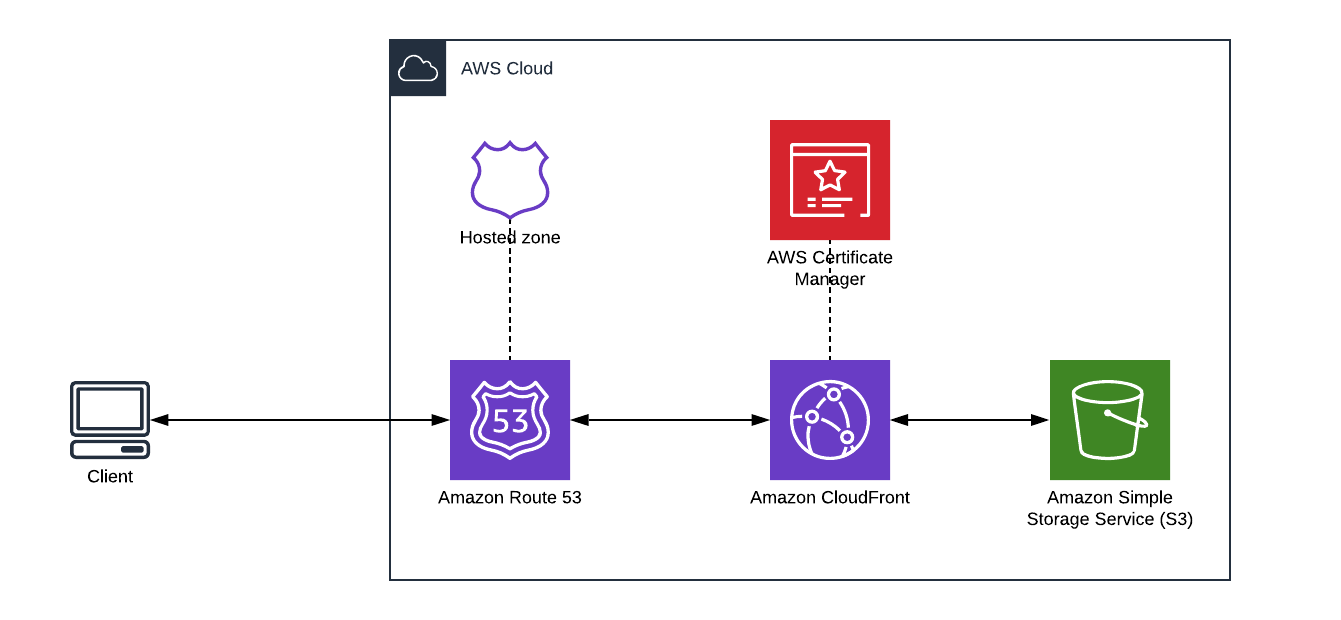
The infrastructure we are deploying and the communication points are shown in the diagram below. We are able to break things into 3 distinct chunks that build on our infrastructure starting with an S3 static site. We add to it by implementing CloudFront for serving the site using a Content Delivery Network (CDN) and finally add our own secured domain.
Dependencies
For this Stack, we are going to need the following dependencies.
npm install @aws-cdk/aws-certificatemanager @aws-cdk/aws-cloudfront @aws-cdk/aws-cloudfront-origins @aws-cdk/aws-route53 @aws-cdk/aws-route53-patterns @aws-cdk/aws-route53-targets @aws-cdk/aws-s3
Just one thing to note, CDK versions change very frequently; this was all written and tested with CDK version 1.59.0.
The Basic Site
The first stage involves creating an S3 bucket and configuring it to serve the files using a S3 static site. We create a new function within our Stack to do this.
private getS3Bucket(bucketName: string) {
    const bucketConfig: BucketProps = {
        bucketName,
        websiteIndexDocument: "index.html",
        websiteErrorDocument: "index.html",
        publicReadAccess: true,
    };

    const bucket = new Bucket(this, "WebsiteBucket", bucketConfig);

    return bucket;
}
The most important part of this is the bucketConfig; it simply sets the name of the bucket, which page should be loaded when a user hits the static site URL and that we want to allow the contents of the bucket to be publicly readable so they can load the site.
We then call the function from within the Stack constructor and define the resulting site URL as a CloudFormation output so that it will be displayed to console and in the Outputs tab in CloudFormation.
const bucketName = "some-bucket-name";

const bucket = this.getS3Bucket(bucketName);

new CfnOutput(this, "URL", {
  description: "The URL of the site",
  value: bucket.bucketWebsiteUrl,
});
When we cdk synth and cdk deploy, we will be able to go to the URL output to the console and have it load our site.
Adding CloudFront
The next stage involves adding CloudFront to ensure our content is served to our users from the nearest edge location so that we get the best possible performance. As part of this, we want to prevent users from accessing the S3 static website directly so we will go back to the bucketConfig and make the following changes.
const bucketConfig: BucketProps = {
  bucketName,
  publicReadAccess: false,
  blockPublicAccess: BlockPublicAccess.BLOCK_ALL,
};
We then create a new function for managing our CloudFront distribution and start by adding a special CloudFront user called an Origin Access Identity (OAI), giving it permissions to access the files in our S3 bucket and serve them to users.
private getCloudFrontDistribution(bucket: Bucket) {
    const oai = new OriginAccessIdentity(this, "WebsiteOAI");
    bucket.grantRead(oai);

    const originConfig: SourceConfiguration = {
      s3OriginSource: {
            s3BucketSource: bucket,
            originAccessIdentity: oai,
      },
      behaviors: [{ isDefaultBehavior: true }],
    };
If you’re building a single-page application, it can also be useful to configure what CloudFront does in the case of a 404 or 403 error to allow your application to respond. We do this using the following configuration.
const errorConfigurations: CfnDistribution.CustomErrorResponseProperty[] = [
  {
    errorCode: 403,
    responsePagePath: "/",
    responseCode: 200,
  },
  {
    errorCode: 404,
    responsePagePath: "/index.html",
    responseCode: 200,
  },
];
Next, we set up the CloudFront distribution using the configuration objects we created above.
    const distribution = new CloudFrontWebDistribution(
        this,
        "WebsiteDistribution",
        {
            originConfigs: [originConfig],
            errorConfigurations,
        }
    );

    return { oai, distribution };
}
Finally, we add the function call to the constructor, passing in the bucket we defined in the previous stage and update the CloudFormation output to display the CloudFront URL.
const { distribution } = this.getCloudFrontDistribution(bucket);

new CfnOutput(this, "URL", {
  description: "The URL of the site",
  value: distribution.distributionDomainName,
});
Again, we run cdk synth and cdk deploy to push our changes and can access the URL shown to view our site.
Adding a Custom Domain and Certificate
Neither the basic website or the CloudFront distribution have particularly readable URLs so it makes sense to use our own custom domain and certificate to serve the content. Using the AWS Console, we can register our own domain through Route53 which will also create a default Hosted Zone for us.
A Hosted Zone is a set of records that detail how to route traffic for a specific domain. To reference the Hosted Zone in CDK, we first have to set the account and region variables in our Stack env which we can simply get from the environment variables in CDK. You would have set these when you initially installed CDK.
new HostingStack(app, "HostingStack", {
  env: {
    account: process.env.CDK_DEFAULT_ACCOUNT,
    region: process.env.CDK_DEFAULT_REGION,
  },
});
From here, we can create a function that gets the default Hosted Zone, creates a new SSL certificate and validates it using DNS validation. Note that you will need to specify the region for the certificate since AWS certificates can only exist in the us-east-1 region.
  private getRoute53HostedZone(url: string) {
    const hostedZone = HostedZone.fromLookup(this, "HostedZone", {
      domainName: url,
    });
    const certificate = new DnsValidatedCertificate(this, "Certificate", {
      hostedZone,
      domainName: url,
      region: "us-east-1",
      validation: CertificateValidation.fromDns(hostedZone),
    });
    return { hostedZone, certificate };
  }
We then create an additional function to add some records to our Hosted Zone which point to our CloudFront distribution (using the A record) and also redirect www traffic to the root domain (using a redirect).
  private getRoute53Records(
    distribution: IDistribution,
    hostedZone: IHostedZone,
    url: string
  ) {
    new ARecord(this, "Alias", {
      zone: hostedZone,
      recordName: url,
      target: RecordTarget.fromAlias(new CloudFrontTarget(distribution)),
    });

    new HttpsRedirect(this, "Redirect", {
      zone: hostedZone,
      recordNames: [`www.${url}`],
      targetDomain: url,
    });
  }
We also need to inform CloudFront that we are using an SSL certificate to serve the content so we make the following changes to our getCloudFrontDistribution function by passing the certificate we created above as one of the parameters.
const viewerCertificate = ViewerCertificate.fromAcmCertificate(certificate, {
  aliases: [url],
});

const distribution = new CloudFrontWebDistribution(
  this,
  "WebsiteDistribution",
  {
    originConfigs: [originConfig],
    errorConfigurations,
    viewerCertificate,
  }
);
Putting it all together, we can now change our constructor to include the certificate and Hosted Zone as below.
const bucketName = "some-bucket-name";
const url = "some-url.com";

const bucket = this.getS3Bucket(bucketName);
const { certificate, hostedZone } = this.getRoute53HostedZone(url);
const { distribution } = this.getCloudFrontDistribution(
  bucket,
  certificate,
  url
);
this.getRoute53Records(distribution, hostedZone, url);

new CfnOutput(this, "URL", {
  description: "The URL of the site",
  value: hostedZone.zoneName,
});
Once we run cdk synth and cdk deploy, we should see our custom domain in the output. Navigating to it should show our site content along with the SSL certificate.
So there you have it, a reusable template for deploying single page applications using AWS CDK. You can view the full template on GitHub and if you have any questions feel free to contact me on Twitter (@TimVeletta). If you also want to know how to scaffold your build pipelines using CDK, my colleague JK Gunnink wrote a great article on it. At Mechanical Rock, we love helping clients build scalable, dependable and reusable systems using infrastructure-as-code to achieve their business goals. If you think we can help you, feel free to contact us.
Troubleshooting
I ran into a couple of issues in putting together this template and couldn’t find a lot of information on how to fix them. I hope this is useful if you are running into similar issues.
Failed to create resource. Cannot request more certificates in this account. Contact Customer Service for details.
So I had this error message after a number of failed stack updates when initially creating the SSL certificate. Chances are it has already created multiple certificates for the same domain which are in Pending Validation state so you have to go through and delete them. Don’t forget to change your region to us-east-1 for this otherwise you won’t see the certificates.
Failed to create resource. Resource is not in the state certificateValidated.
This issue was related to my Route53 settings which caused problems when trying to validate the SSL certificate. To fix it, I had to ensure my domain name servers matched the ones listed in my Hosted Zone.