Cross-Account Inception Pipeline with AWS CDK
Tags: codepipeline cloud-development-kit infrastructure-as-code aws cdk cross-accountThe inception pipeline which Mechanical Rock’s very own Pete Yandell pioneered back in early 2018 was created as a way to manage a pipeline through code, which even has the ability to update itself through CloudFormation steps. What I love about it is not only the self managing aspect, but also that there is checked in history (so you can easily go back to a point in time), accountability, and repeatability. Because you’re not using the console to setup your infrastructure, reproducing it should disaster strike is minutes of deployment time for resources to provision.
Using this for a few projects over the past 18 months or so has highlighted its value as projects develop, more steps are added, additional permissions are required or locked down and once you have a few resources, it quickly becomes a very large YAML file with over 1,000 lines of text. Anyone who’s ever written large CloudFormation files will understand the pains of making sure resources are lined up and will be created and updated in the way you expect. Yes there are linting tools and other developer tools which can help make sure resources are referenced correctly etc, until you go to deploy. Enter: Cloud Development Kit.
What is the CDK?
The CDK is a relatively new tool from AWS which enables developers to build infrastructure at insane speed compared to more historic/traditional methods of writing out lines and lines of YAML or JSON. Using programming languages such as Typescript or Python, developers can make use of functions to scaffold code quickly, and under the hood the toolkit implements best-practices of secure development which, for example is the principle of least privilege.
Let me give you an example. Let’s say I want to create an S3 bucket with CloudFront to serve a react application.
export class ReactFrontEndStack extends cdk.Stack {
  public constructor(scope: cdk.Construct, id: string, props?: cdk.StackProps) {
    super(scope, id, props);

    const oai = new cloudfront.OriginAccessIdentity(this, "OAI");
    const websiteBucket = new s3.Bucket(this, "ReactHostingBucket", {
      websiteIndexDocument: "index.html",
      publicReadAccess: false,
      bucketName: "my-website-bucket",
    });
    websiteBucket.grantRead(oai);

    new cloudfront.CloudFrontWebDistribution(this, "ReactAppHostingDistribution", {
      originConfigs: [
        {
          s3OriginSource: {
            s3BucketSource: websiteBucket,
            originAccessIdentity: oai,
          },
          behaviors: [{ isDefaultBehavior: true }],
        },
      ],
    });
  }
}
In less than 30 lines of code, I have created an S3 bucket with a CloudFront distribution for serving up a react application. I even have some custom stuff in there for only granting my CloudFront distribution permission to read the bucket contents via a origin access identity. For a reference point, the above code generates about 200 lines of CloudFormation JSON, which is about 130 lines of YAML
Setting up our Pipeline
Now that we have a taste for CDK, how does it fit in with the inception pipeline? If we go back to
the original post we can see that the pipeline, once
built runs a CloudFormation step called AdministerPipeline where it runs a CloudFormation step
which updates the very infrastructure on which it runs! This causes the pipeline to update, and if
enabled, there’s a flag which can be set which is to restart the pipeline when updated. In order to
facilitate this, we need to have that same step.
So let’s take a look. Since the CDK needs to be executed (as it’s a function now) to generate the required CloudFormation, we need to first run a CodeBuild action which will do this for us. Let’s do that first:
const cdkBuild = new codebuild.PipelineProject(this, "CdkBuild", {
  buildSpec: codebuild.BuildSpec.fromObject({
    version: "0.2",
    phases: {
      install: {
        "runtime-versions": { nodejs: 12 },
        commands: ["cd build-pipeline", "npm i npm@latest -g", "npm install"],
      },
      build: {
        commands: ["npm run build", "npm run cdk synth -- -o dist"],
      },
    },
    artifacts: {
      "base-directory": "build-pipeline/dist",
      files: [`${this.stackName}.template.json`],
    },
  }),
  environment: {
    buildImage: codebuild.LinuxBuildImage.STANDARD_3_0,
  },
});
Looking at our inline buildspec file, there’s a few things to take note of. First, we are using the
latest version of the linux build image as we are working with Node 12, which requires the standard
3.0 image. Second when we run the cdk synth command, we are outputting our generated JSON
CloudFormation files to the dist directory which we then refer to as a build artifact.
Great, so now after our pipeline has started the first step is to run this CodeBuild image, and
generate ourselves some raw CloudFormation files as artifacts. Next, we pass those artifacts to the
AdministerPipeline step we talked about above which has the ability to self-manage the pipeline
through a CloudFormation step.
Let’s take a look at the code pipeline construct in its current form:
new codepipeline.Pipeline(this, "BuildPipeline", {
  stages: [
    {
      stageName: "Source",
      actions: [
        new codepipeline_actions.GitHubSourceAction({
          owner: "MechanicalRock",
          repo: "my-example-repo",
          output: sourceOutput,
          actionName: "GitHubSource",
          oauthToken: oauth,
          trigger: codepipeline_actions.GitHubTrigger.WEBHOOK,
        }),
      ],
    },
    {
      stageName: "BuildAndAdministerPipeline",
      actions: [
        new codepipeline_actions.CodeBuildAction({
          actionName: "CDK_Build",
          project: cdkBuild,
          input: sourceOutput,
          outputs: [cdkBuildOutput],
          runOrder: 1,
        }),
        new codepipeline_actions.CloudFormationCreateUpdateStackAction({
          actionName: "AdministerPipeline",
          templatePath: cdkBuildOutput.atPath(`${this.stackName}.template.json`),
          stackName: this.stackName,
          adminPermissions: true,
          runOrder: 2,
        }),
      ],
    },
  ],
  restartExecutionOnUpdate: true,
});
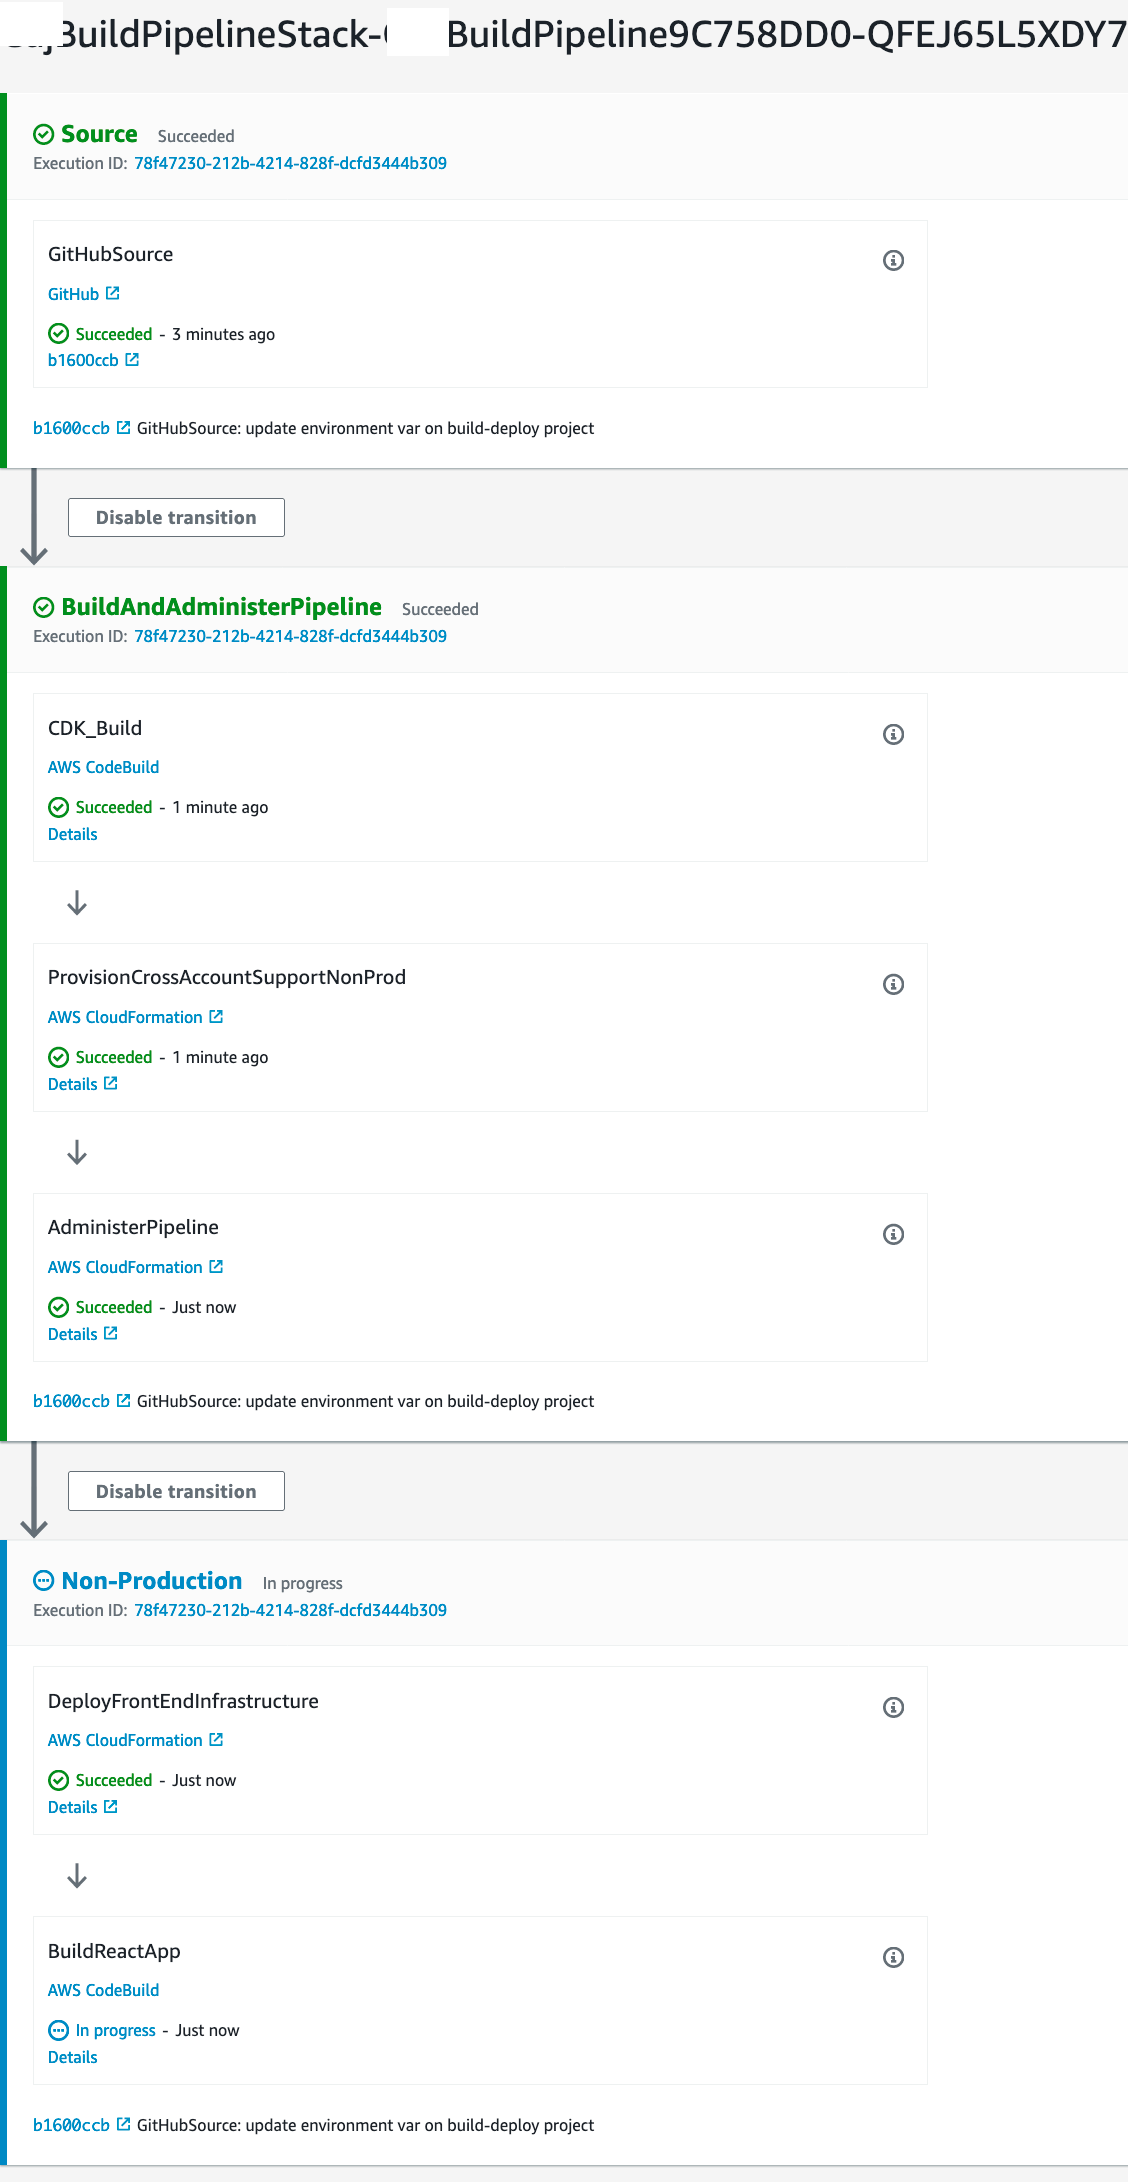
As we can see above, the pipeline starts with code being commited to the GitHub repository. Then it
runs through the CodeBuild stage to build and synthesise a CloudFormation template which we output
as an artifact. In the next step of the BuildAndAdministerPipeline stage we run the generated
CloudFormation script to self-manage the pipeline.
Cross-Account pipeline deployments
Ok great! So now we’ve replicated the Inception Pipeline as CDK. Where is my promised cross-account deployments I hear you asking? I’m glad you asked. Let’s dive in.
That FrontEnd stack we generated earlier now can be used as a stack in the target workload account. Normally we’d have two workload accounts, production and non-production. For the sake of demonstration, and brevity of this post, we’ll just work with one account - non-prod.
The root of the project exists in the /bin folder of a CDK project. From here you define a bunch
of stacks and replication of stacks for different environments. Let’s take a look at the one I’ve
got:
const buildAccount = { account: "123", region: "ap-southeast-2" };
const nonProdAccount = { account: "456", region: "ap-southeast-2" };
const prodAccount = { account: "789", region: "ap-southeast-2" };

const app = new cdk.App();

new BuildPipelineStack(app, "BuildPipelineStack", {
  env: buildAccount,
  nonProd: nonProdAccount,
});
new ReactFrontEndStack(app, "NonProdReactFrontEndStack", { env: nonProdAccount });
new ReactFrontEndStack(app, "ProdReactFrontEndStack", { env: ProdAccount });
As you can see, I’ve got a build account which is where the pipeline lives, I’ve got a non-prod and prod account which both reference the same stack. Neato! Just by passing environment variables in, I can create as many stacks as I need.
As an aside, if I wanted to test my stack in a new region for example, I could easily spin one up like so:
const nonProdAccountIreland = { account: "456", region: "eu-west-1" };
new ReactFrontEndStack(app, "NonProdReactFrontEndStackIreland", { env: nonProdAccountIreland });
So now that we’ve specified a destination account, let’s update our pipeline by creating a new stage. At the top of the pipeline file, I’ve also defined the stack name for reasons you’ll see soon:
const NPRFES = "NonProdReactFrontEndStack";

{
  stageName: "Non-Production",
  actions: [
    new codepipeline_actions.CloudFormationCreateUpdateStackAction({
      // NOTE: Here is the account number of the destination account.
      account: props.nonProd.env.account,
      actionName: "DeployFrontEndInfrastructure",
      adminPermissions: true,
      // Hard coded as cdk only synthesises the template. The deployment is separate.
      templatePath: cdkBuildOutput.atPath(`${NPRFES}.template.json`),
      stackName: `${NPRFES}`,
      region: props.nonProd.env.region,
      runOrder: 1,
    }),
    new codepipeline_actions.CodeBuildAction({
      actionName: "BuildReactApp",
      project: buildDeployReactNonProd,
      input: sourceOutput,
      runOrder: 2,
    }),
  ],
},
But where is that template coming from? Glad you asked. It’s part of the synthesised template which we generate the build cdk stage of the pipeline. The artifacts array needs to be updated:
artifacts: {
  "base-directory": "build-pipeline/dist",
  files: [
    `${this.stackName}.template.json`,
    `${CRSS}.template.json`,
    `${NPRFES}.template.json`,
  ],
},
The eagle-eyed reader among us will notice some strange string substitution going on here, let me explain. When the CDK synthesises it will generate stacks for everything that is required. This includes sub-stacks (our front-end stack, for example), as well as supporting stacks that are needed in destination accounts in order for the deployments to work.
const NPRFES = "NonProdReactFrontEndStack";
const CASS = "cross-account-support-stack-<account number>";
The CASS variable I’ve invented above is the name I’ve given to the template that is generated by a synthesis of the CDK application we’re working with.

In order to allow the pipeline to deploy cross-account, we need to provision a role and permissions for CloudFormation to assume. We do this through the intermediate step in the BuildAndAdministerPipeline stage.
So the revised stage now looks like this:
stageName: "BuildAndAdministerPipeline",
actions: [
  new codepipeline_actions.CodeBuildAction({
    actionName: "CDK_Build",
    project: cdkBuild,
    input: sourceOutput,
    outputs: [cdkBuildOutput],
    runOrder: 1,
  }),
  new codepipeline_actions.CloudFormationCreateUpdateStackAction({
    actionName: "ProvisionCrossAccountSupportNonProd",
    account: props.nonProd.env.account,
    templatePath: cdkBuildOutput.atPath(`${CASS}.template.json`),
    stackName: "CrossAccountSupport",
    adminPermissions: true,
    runOrder: 2,
  }),
  new codepipeline_actions.CloudFormationCreateUpdateStackAction({
    actionName: "AdministerPipeline",
    templatePath: cdkBuildOutput.atPath(`${this.stackName}.template.json`),
    stackName: this.stackName,
    adminPermissions: true,
    runOrder: 3,
  }),
],
Before this stage can run the first time, it needs to be deployed in the destination account once,
by a user that has suitable permissions to do so - either via the CLI or console by uploading the
template. This is because the first time the automated pipeline doesn’t have any permissions to do
anything. So we need to grant it permissions to do so, by deploying a stack on its behalf which
gives it, it’s required permissions. This would be similar to deploying via the CLI with
cdk synth && cdk deploy except because we are using individual stacks to do it, and using
CloudFormation steps, each step needs its own template, and permissions to run. After the first
deployment, it can manage the permissions other resources need on its own.
Finally, we can run the whole pipeline. Before we do, we just need to chat about some intricacies I’ve discovered with the CDK and the way we are doing deployments and managing the templating.
Important Caveats with this approach
The CDK does NOT expect deployments to be done the way we are going about them. What this means is that when we do deployments we have to be aware of circular dependencies. And example of this is with regards to buckets and permissions.
We create a bucket in the React front-end stack. The stack is dependent on the build pipeline existing in order for it to be able to do anything. That’s ok. But then, we need to pass permissions back up the to the pipeline from a bucket that is created in the front-end stack which needs to grant permissions to it to write to that destination bucket. Unfortunately, in situations like this the CDK tries to be a little too helpful.
If instead of:
websiteBucket.grantWrite(new iam.AccountPrincipal(accountId));
I did
websiteBucket.grantWrite(new iam.AccountPrincipal(buildPipelineStack.codebuildInstance));
When I synthesised the template, the CDK would see that I needed to grant permissions to a bucket which lived in another account so what it would do is try to create that permissions first, but the problem is here is that the pipeline has to create the resources in the first place since it’s the root of all things for this project. So it is effectively trying to create permissions for something that doesn’t exist.
Being aware of cross stack dependencies is super important thing to consider, when doing your infrastructure-as-code. To combat this, I observed how I had handled this in the past with YAML/JSON CloudFormation templates and noticed a naming scheme/convention which we follow in order to provision resources, when the circular dependencies like this exist. As a solution I followed a similar convention to proceed.
Now, at the top of the Pipeline file for the CDK stack we have:
// Shared Names
const NonProdBucketReactApp = "my-website-bucket";
const NPRFES = "NonProdReactFrontEndStack";
const CASS = "cross-account-support-stack-<account ID>";
Second I created permissions on the build-account side to enable the CodeBuild instance to be able to write to S3:
// Allow codebuild to use the S3 service.
// We need to put this here so that the build account grants the codebuild role permissions to
// use S3 as well as in the destination account to allow writing to the destination bucket.
buildDeployReactNonProd.addToRolePolicy(
  new iam.PolicyStatement({
    actions: ["s3:DeleteObject*", "s3:PutObject*", "s3:Abort*"],
    effect: iam.Effect.ALLOW,
    resources: [`arn:aws:s3:::${NonProdBucketReactApp}`, `arn:aws:s3:::${NonProdBucketReactApp}/*`],
  }),
);
In this way, we allow the build service a specific permission to the role that runs the CodeBuild instance for the react application. We then grant that CodeBuild instance write privileges to the destination bucket in the workload account in order to be able to output the react application to the bucket. Let’s take a look a the finished product:
In summary
We’ve talked about how we can use the CDK to build out an inception pipeline with cross account deployments. I showed step-by-step some examples of how you can leverage a separate AWS build account to run a pipeline which brings in your source code, manages itself and does cross account deployments using the principle of least privilege to use roles and permissions as needed to completely automate our infrastructure and deployments.
I hope you got something out of it, if you have any questions, feel free to hit me up on Twitter (@jgunnink). At Mechanical Rock, we’ve helped clients build many scalable systems that rely on infrastructure as code that is repeatable, and dependable. If you think we can help you, feel free to contact us or tweet us.