Building a Serverless RPC API on AWS: A simple RPC service with help from Twitch
Tags: rpc grpc twirp aws api protobuf
In the preceding installment, I discussed some of the popular API flavours, and settled on attempting to build an RPC style API. After a brief look around at some RPC frameworks (including GRPC) - I decided to go with Twirp by Twitch.
It has a fair amount in common with gRPC, e.g. the use of protobufs - but doesn’t have a dependence on bidirectional streaming or HTTP 2. This make it easier/possible to use from a lambda function, and this is useful to me because it requires less infrastructure to run. To stand up a GRPC service, I would need to use Fargate and a host of additional VPC related components.
Let’s get stuck into it - there are a few things we will need to do first though.
- Install Go & AWS SAM.
- Install Protobuf
- Scaffold the repository
- Define our service
- Generate the code
- Implement our service
- Integrate with Lambda/API Gateway
- Deploy the service with AWS SAM
It probably goes without saying but you will need an AWS Account if you wish to deploy the sample service. The following article is available to help with this you require it: How do I create and activate a new AWS account?.
All code for this tutorial may be found here.
Install Go
This steps involved will vary depending on your Operating System. For those on Linux or OSX, this will probably mean installing it via your package manager. For all my examples I will be using Go 1.16.x, but any version with Go Module support should be fine. Further Go installation instructions are available here.
Install AWS SAM
I’m going to deploy the service using AWS SAM out of pure convenience. To follow along you will need to download the AWS SAM CLI, for which you can find instructions here. I recommend going through the “Getting Started” section to ensure SAM is able to interact with your AWS Account.
Install Protobuf
You will need a compatible protobuf compiler in order to generate code from the protobuf IDL. You will need a version 3 compiler. The GRPC documentation details how to install protoc.
Scaffold the Repository
Change into what ever directory you use for your projects, and create a folder for the service. Lets just create a simple service that allows someone to “claim” domain names. All it will do is write domain names to a database. Create the following file…
$ cd ~/projects
$ mkdir ledger
$ cd ledger
Initialise the repository.
$ go mod init github.com/<your-username>/ledger
We are going to install some additional tools. We can do this by creating a tools.go file, and adding the following imports.
// +build tools

package tools

import (
        // golang code generator for protobuf
        _ "google.golang.org/protobuf/cmd/protoc-gen-go"
        // the twirp service generator
        _ "github.com/twitchtv/twirp/protoc-gen-twirp"
)
You will need go get each dependency in order to install and add it to the go.mod file.
Go ahead and create a Makefile with the following entries. This will allow you to download dependencies and tools you require.
download:
	@echo Download go.mod dependencies
	@go mod download

install-tools: download
	@echo Installing tools from tools.go
	@cat tools.go | grep _ | awk -F'"' '{print $$2}' | xargs -tI % go install %
We can start constructing our service now.
$ mkdir -p rpc/ledger
$ touch rpc/ledger/service.proto
The service.proto file will contain our service definitions.
Let’s add some content to define our service.
// the proto buf version
syntax = "proto3";

// declare the package this file belongs to
package ledger;

// specify the go package of the generated code
option go_package = "rpc/ledger";

// Define a service with one method
service Ledger {
    rpc ClaimDomain(ClaimDomainInput) returns (ClaimDomainOutput);
}

message ClaimDomainInput {
    string ClientRequestToken = 1; // we will use this to enforce idempotency - I'll explain this further in another post
    string Subdomain = 2; //
    string Root = 3; // We will assume we are claiming subdomains on a set of domains we happen to own
}

message ClaimDomainOutput {
    Domain Domain = 1;
}

message Domain {
    string Root = 2;
    string Subdomain = 3;
}
That’s all for the definition. Now we need to generate the service code.
To do this I would add the following entry to the makefile.
gen:
	# Auto-generate code
	protoc \
		-I . \
		--twirp_out=. \
		--go_out=. rpc/ledger/service.proto
Executing make gen should then create the following files;
- service.pb.go, which contains the protobuf go code, and,
- service.twirp.go, which contains the twirp service go code.
We need to actually implement the service now. I’ll implement this in an internal folder.
$ mkdir -p internal/ledger
$ touch internal/ledger/service.go
A really basic implementation of the file would look something like this.
package ledger

import (
	"context"

	pb "github.com/matt-tyler/ledger-one/rpc/ledger"
)

type Server struct{}

func (s *Server) ClaimDomain(ctx context.Context, input *pb.ClaimDomainInput) (*pb.ClaimDomainOutput, error) {
	return &pb.ClaimDomainOutput{
		Domain: &pb.Domain{
			Root:      input.Root,
			Subdomain: input.Subdomain,
		},
	}, nil
}
This isn’t particularly useful. Let’s assume that all we want to do is write the request to DynamoDB. We will pass in a DynamoDB client when we create the server, and the consume it to perform various commands.
We need to add the following SDK dependencies.
$ go get github.com/aws/aws-sdk-go-v2/aws
$ go get github.com/aws/aws-sdk-go-v2/config
$ go get github.com/aws/aws-sdk-go-v2/service/dynamodb
We’ll do the simplest thing we could possibly do - and write the data using the PutItem command.
package ledger

import (
	"context"

	"github.com/aws/aws-sdk-go-v2/service/dynamodb"
	"github.com/aws/aws-sdk-go-v2/service/dynamodb/types"
	pb "github.com/matt-tyler/ledger-one/rpc/ledger"
)

func NewService(ddb dynamodb.Client) (*Server, error) {
	return &Server{ddb}, nil
}

type Server struct {
	ddb dynamodb.Client
}

func (s *Server) ClaimDomain(ctx context.Context, input *pb.ClaimDomainInput) (*pb.ClaimDomainOutput, error) {
	command := dynamodb.PutItemInput{
		Item: map[string]types.AttributeValue{
			"pk": &types.AttributeValueMemberS{Value: input.Root},
			"sk": &types.AttributeValueMemberS{Value: input.Subdomain},
		},
	}

	if _, err := s.ddb.PutItem(ctx, &command); err != nil {
		return nil, err
	}

	return &pb.ClaimDomainOutput{
		Domain: &pb.Domain{
			Root:      input.Root,
			Subdomain: input.Subdomain,
		},
	}, nil
}
With that out of the way we’ve more or less implemented the service, and we now need to add the bits that will get it working in a lambda function.
$ mkdir -p cmd/ledger
$ touch cmd/ledger/main.go
You will want to install the following packages.
$ go get github.com/aws/aws-lambda-go/events
$ go get github.com/aws/aws-lambda-go/lambda
$ go get github.com/awslabs/aws-lambda-go-api-proxy/core
Now let’s implement the main file.
// main.go
package main

import (
	"context"
	"log"
	"net/http"
	"os"

	"github.com/aws/aws-lambda-go/events"
	"github.com/aws/aws-lambda-go/lambda"
	"github.com/aws/aws-sdk-go-v2/config"
	"github.com/aws/aws-sdk-go-v2/service/dynamodb"
	"github.com/aws/smithy-go/middleware"
	"github.com/awslabs/aws-lambda-go-api-proxy/core"

	"github.com/matt-tyler/ledger-one/internal/ledger"
	m "github.com/matt-tyler/ledger-one/internal/middleware"
	rpc "github.com/matt-tyler/ledger-one/rpc/ledger"
)

type APIGatewayProxyHandler = func(ctx context.Context, event events.APIGatewayProxyRequest) (events.APIGatewayProxyResponse, error)

func createHandler(serveHTTP http.HandlerFunc) APIGatewayProxyHandler {
	handler := func(ctx context.Context, event events.APIGatewayProxyRequest) (events.APIGatewayProxyResponse, error) {
		reqAccessorV2 := core.RequestAccessor{}
		req, err := reqAccessorV2.ProxyEventToHTTPRequest(event)
		if err != nil {
			return events.APIGatewayProxyResponse{
				StatusCode: 500,
			}, nil
		}
		log.Println(req.Method, req.URL.String())
		writer := core.NewProxyResponseWriter()

		serveHTTP(writer, req.WithContext((ctx)))
		res, err := writer.GetProxyResponse()
		return res, err
	}
	return handler
}

func main() {
	cfg, err := config.LoadDefaultConfig(context.Background())
	if err != nil {
		log.Panicf("Unable to load SDK config\n, %v", err)
	}

	tableName, ok := os.LookupEnv("TABLE_NAME")
	if !ok {
		log.Panicln("Failed to find required environment variable: TABLE_NAME")
	}

	withEndpoint := func(options *dynamodb.Options) {
		if endpoint, ok := os.LookupEnv("DDB_ENDPOINT"); ok {
			options.EndpointResolver = dynamodb.EndpointResolverFromURL(endpoint)
		}
	}

	ddb := dynamodb.NewFromConfig(cfg, withEndpoint, dynamodb.WithAPIOptions(func(stack *middleware.Stack) error {
		// Attach the custom middleware to the beginning of the Initialize step
		return stack.Initialize.Add(m.DefaultTableNameMiddleware(tableName), middleware.Before)
	}))

	l, _ := ledger.NewService(*ddb)
	service := rpc.NewLedgerServer(l)
	// Make the handler available for Remote Procedure Call by AWS Lambda
	lambda.Start(createHandler(service.ServeHTTP))
}
Lambda functions written in Go implement the lambda runtime client. The main function is responsible for creating any handlers, which are then passed to lambda.Start. The service process will then listen for events and pass them to your handler.
The second piece of magic is the use of github.com/awslabs/aws-lambda-go-api-proxy/core. This library allows us to take API Gateway events and convert them into HTTP requests that match the Go HTTP.Request structure. This allows us to provide the same HTTP handlers that most Go frameworks require, therefore allowing most Go frameworks an easy way to slot into a lambda function. There are many standard adapters available, but I had to write my own as there was not one for Twirp available.
I also created my own middleware in order to set the table name to the same value in all my subsequent calls to the DynamoDB service. As I only ever intend to make calls to one DynamoDB table, this is the right choice for me to make.
With that, we now have the service completely implemented. Our next step is to deploy the service to AWS. We’ll need a compatible SAM template to do that. The following should work fine.
AWSTemplateFormatVersion: "2010-09-09"
Transform: AWS::Serverless-2016-10-31
Resources:
  Gateway:
    Type: AWS::Serverless::HttpApi
    Properties:
      Auth:
        FailOnWarnings: true
        DefaultAuthorizer: AWS_IAM

  Storage:
    Type: AWS::DynamoDB::Table
    Properties:
      BillingMode: PAY_PER_REQUEST
      KeySchema:
        - AttributeName: pk
          KeyType: HASH
        - AttributeName: sk
          KeyType: RANGE

  Backend:
    Type: AWS::Serverless::Function
    Properties:
      Runtime: go1.x
      Handler: api
      Timeout: 10
      Policies:
        - DynamoDBCrudPolicy:
            TableName: !Ref Storage
      Environment:
        Variables:
          TABLE_NAME: !Ref Storage
      Events:
        RootHandler:
          Type: HttpApi
          Properties:
            ApiId: !Ref HttpApi
            Path: /{proxy+}
            Method: post

Outputs:
  Endpoint:
    Value: !Sub https://${Gateway}.execute-api.${AWS::Region}.amazonaws.com
We’ll then make some adjustments to our Makefile in order to deploy this. This will involve adding some additional targets that need to be build, as well as adding a deployment command.
Assuming you have credentials available, you should be able to run make deploy in order to deploy the service to AWS. The completed makefile (heavily inspired by this repo) looks as follows.
# These environment variables must be set for deployment to work.
S3_BUCKET := $(S3_BUCKET)
STACK_NAME := $(STACK_NAME)

# Common values used throughout the Makefile, not intended to be configured.
TEMPLATE = template.yaml
PACKAGED_TEMPLATE = packaged.yaml

download:
	@echo Download go.mod dependencies
	@go mod download

install-tools: download
	@echo Installing tools from tools.go
	@cat tools.go | grep _ | awk -F'"' '{print $$2}' | xargs -tI % go install %

gen:
	# Auto-generate code
	protoc \
		-I . \
		--twirp_out=. \
		--go_out=. rpc/ledger/service.proto

.PHONY: clean
clean:
	rm -rf ./bin

.PHONY: build
build:
	go build -o bin/ledger cmd/ledger/main.go

.PHONY: build-lambda
build-lambda:
	CGO_ENABLED=0 GOOS=linux GOARCH=amd64 go build \
		-a -installsuffix cgo \
		-o bin/lambda/ledger cmd/ledger/main.go

.PHONY: package
package: build-lambda
	sam package \
		--template-file $(TEMPLATE) \
		--s3-bucket $(S3_BUCKET) \
		--output-template-file $(PACKAGED_TEMPLATE)

.PHONY: deploy
deploy: package
	sam deploy \
		--stack-name $(STACK_NAME) \
		--template-file $(PACKAGED_TEMPLATE) \
		--capabilities CAPABILITY_IAM

.PHONY: teardown
teardown:
	aws cloudformation delete-stack --stack-name $(STACK_NAME)
This requires you to set S3_BUCKET and STACK_NAME environment variables before running make deploy. The former will be the bucket that the binary is stored in, which lambda will pull from in order to execute the service.
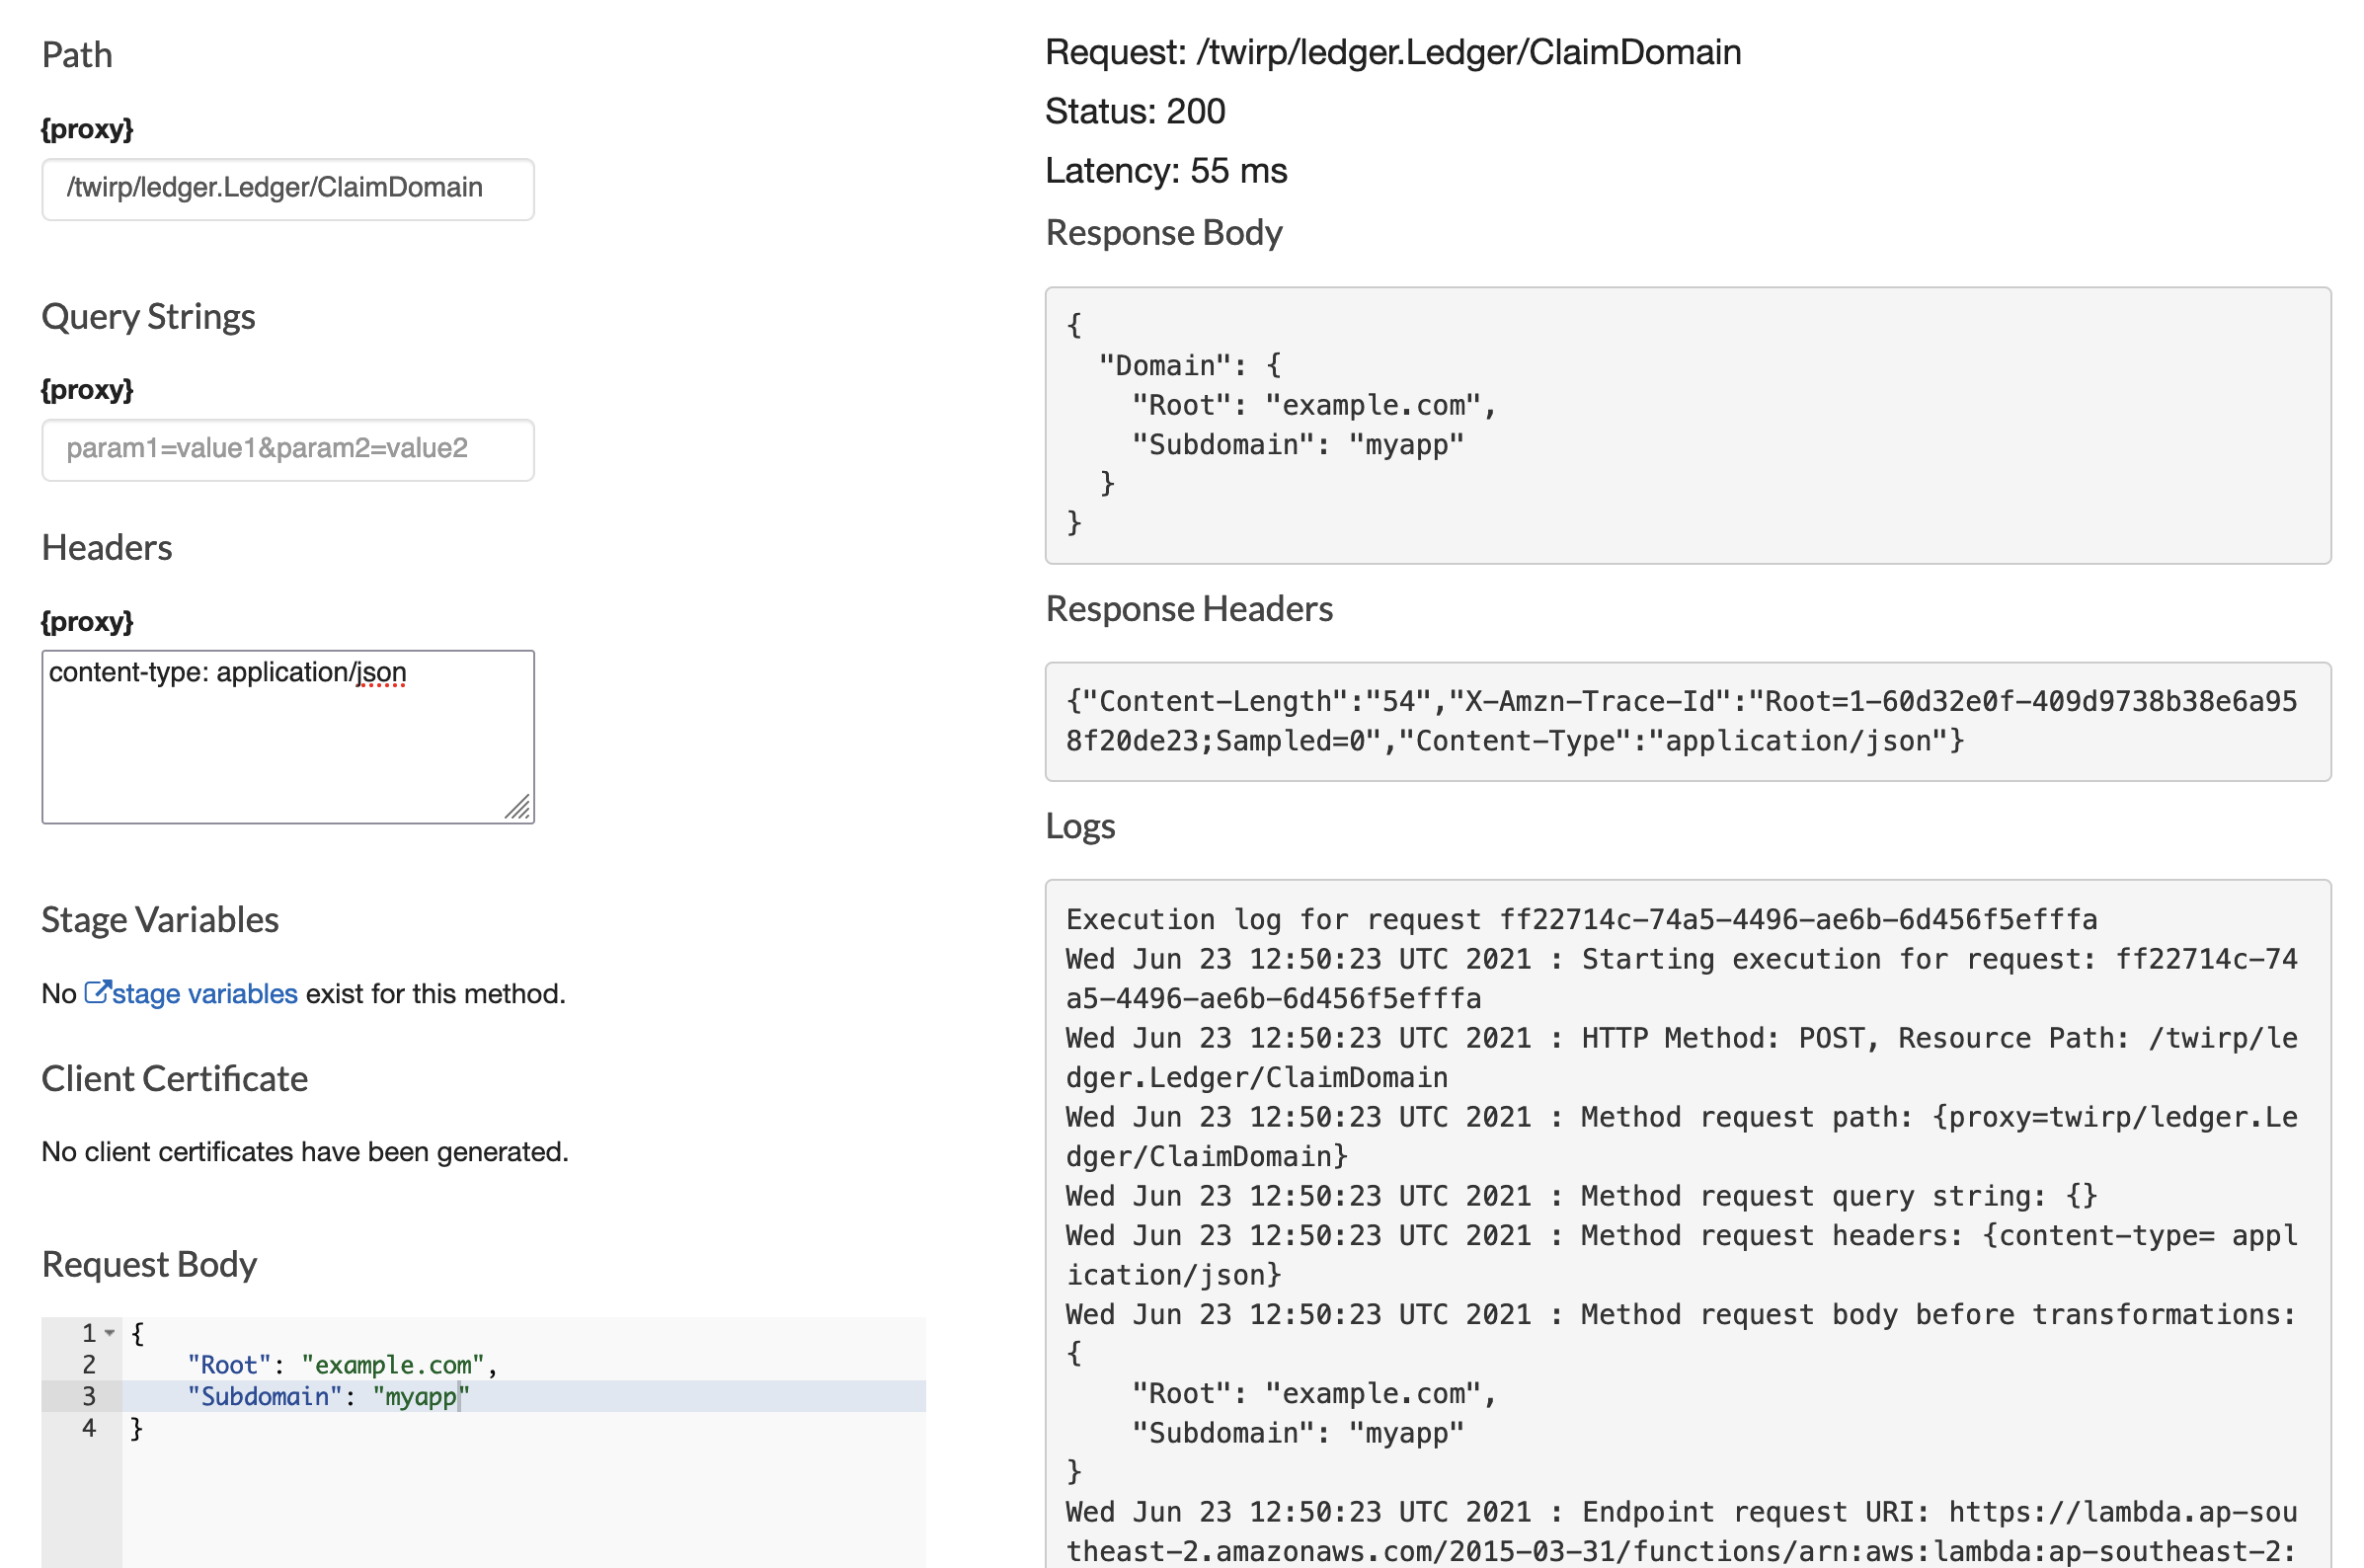
After you’ve deployed to your account, you will able to find it in the API Gateway pane…

And you can test it by invoking it in the console!

Conclusion
We covered a lot of ground here in order to deploy our service. This included scaffolding our repository to work with Go, SAM, and Protobuf for a seamless deployment, as well as integrating the Go Lamda Runtime with Twirp.
In future installments I will;
- Explain how to write middleware for Go SDK
- Demonstrate an easy way to validate API input
- How to instrument our service
And more!
Don’t be shy, get in touch with us!

