Securing your web applications in AWS using SSO with Azure Active Directory
Tags: aws cognito oidc saml2 sso azureIt’s a fairly common scenario where you want to secure a web application in the cloud; but with so many technologies and different ways to secure your applications, it can be difficult to know where to get started. You may have questions, such as:
- should I handle authentication within my web application itself, or within infrastructure?
- how can I integrate with my organisation’s identity provider?
- can I automate the securing of my web application?
- how can others in my organisation leverage this pattern?
At Mechanical Rock, two of our pillars of excellence are
We leverage best of breed cloud native and managed services to build high quality, cutting edge solutions. Delivering these solutions using Infrastructure-As-Code (IAC) is not simply part of our commitment to architecting steadfast continuous integration workflows; it underpins the way we collaborate and share learnings with the client teams we engage with.
An opinionated web authentication method
Most large organisations invest in single sign on capabilities for their colleagues, which is typically good for security practice - provide one authentication method, and make it strong, with password rotations and multi-factor authentication.
The solution we will focus on here is a pattern we commonly use when working with large enterprise clients, that have an established identity provider:
- Microsoft Azure Active Directory as Identity Provider
- AWS Cognito as Authentication Service
- AWS Application Load Balancer as authentication proxy to our web application
Our example assumes a web application running on ECS or EC2 or similar, but in reality it can be anything that can update a Load Balancer Target Group.
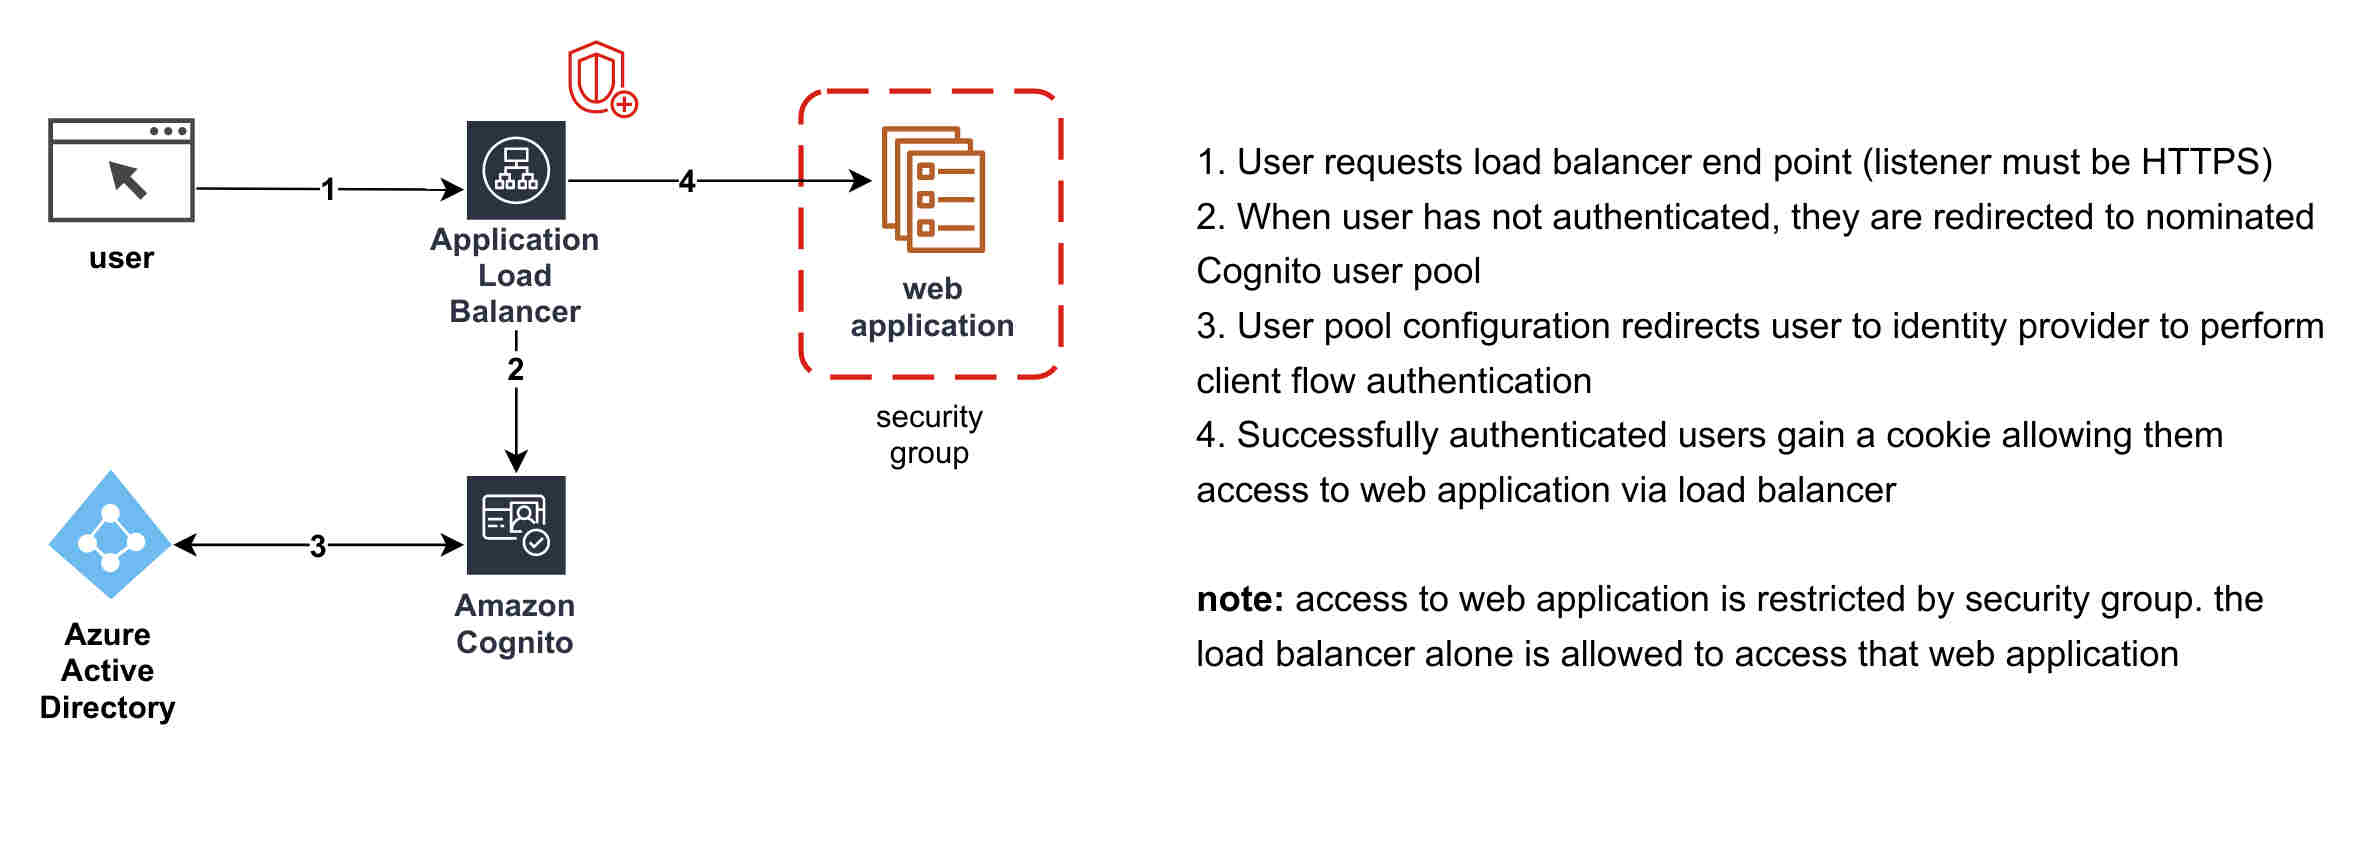
Summarising the solution:
- an application load balancer (ALB) is used in front of the web application
- the ALB checks if the user is authenticated, and if not, delegates to Cognito to perform authorisation
- Cognito integrates with Azure AD to achieve single sign on, and allows users to sign on as they normally would with their enterprise
- Cognito redirects authenticated users back to the ALB which then passes them through to the web application
Automation: Infrastructure as Code
Whilst AWS Cognito is a powerful security product, it is not without some significant shortcomings. The inability to export or backup User Pool users is exacerbated by the ease with which the whole user pool can be replaced (and thus, users destroyed) by simple Cloudformation changes.
DevOps practitioners have also been left wanting by Cognito’s poor cloudformation support. With virtually no updates since 2017, current Cloudformation support covers perhaps 50% of what CLI and SDK users can do with Cognito, leaving users to write their own custom resources for common Cognito use cases.
This brings us to reason for this post - and the supporting repository - to provide an infrastructure-as-code solution for setting up and managing an AWS ALB, Cognito and Azure AD single sign on.
The repository helps you setup the following:
- CodePipeline for managing your cloudformation resources
- Cognito Custom Resources to assist in (automated) configuration
- Cognito User Pool, Pool Client, Federated SAML Identity Provider, Resource Servers, etc.
- Application Load Balancer, Listener and Rules to defer authentication to Cognito
Getting Cognito working with Azure Active Directory
The flow of setting up single sign on tends to go as follows:
A notable pain point is that when ever you need to amend the attributes associated with your user pool, the whole user pool must be recreated, meaning a new user pool ID is generated. This means that the Entity Id within your Azure Enterprise Application - which contains the user pool ID - must be updated. If you are lucky, this is something you can do yourself, but that is unlikely to be the case in most large organisations.
Mapping attributes from Azure to Cognito attributes
Typical attributes to configure in a user pool will be a principal name and email. Ensure that they are configured with mutable set to true so that Cognito can continue to synchronise the dynamic users it creates, with those users in Azure Active Directory. It’s often a good idea to also include the groups attribute.
It’s an unfortunate trait of Cognito that it is not possible to amend custom attributes once created - including their mutable flag - so it’s good to understand what attributes you need as early as possible, to avoid having to re-create the Cognito User Pool over and over.
When using Cognito as a facilitator for single sign on with Azure Active Directory, you will probably want to use the principal’s directory based security groups. Note that it is also possible to manage your own user groups in Cognito, though many organisations prefer to manage their authentication and authorisation with a single identity provider.
Adding custom attributes is as simple as defining them in your Cognito User Pool. From there, you can add mappings to them from your identity provider’s available claim types - these are available in the metadata xml file provided by Azure AD when your Enterpise Application is created. Remember - make your cognito attributes mutable if you want to map them from your identity provider.
Bringing it all together
There can be various stumbling blocks along the way when bringing together a single sign on solution with Cognito and Azure AD. Here are some things to watch out for:
- Keep the SAML Identifier (Entity Id) correct and up to date in your Azure Enterprise Application
- Ensure your SAML Reply URL is appropriate for your Cognito domain (e.g. https://YOUR-COGNITO-DOMAIN.auth.AWS-REGION.amazoncognito.com/saml2/idpresponse ) in your Azure Enterprise Application
- If you are not getting AD groups in your token, ensure you have enabled them in the User Attributes & Claims screen of your Azure Enterprise Application
- If you get Cognito errors about redirect_uri, ensure your Cognito App Client settings Reply URLs are correct (e.g. https://your-load-balancer-address-or-domain/oauth2/idpresponse) - note that you can include multiple reply and logout URLs by comma separating the URLs
Once you’ve made this work once, you’ll find it easy to share among your team and customers in the future, and repeat over and again.