
Unity & React
# react react components unity digital twinUnity is a powerful and versatile platform for 3D development. It is known for its ability to handle complex 3D models and environments, as well as its strong focus on creating visually appealing and interactive experiences. Unity also has a strong community and a wealth of documentation and resources available online.
ReactJS is a popular choice for building user interfaces because it’s easy to learn and use. It’s also very flexible and can be used to build a wide range of applications, from simple websites to complex web apps. It has a wide range of support and it’s index in the State of Frontend report is strong.
The reason you’d consider using React with Unity is because React is a great choice for building user interfaces, but it’s not so great for building 3D models and environments. Unity is a great choice for building 3D models and environments, but it’s not so great for building user interfaces. So, by joining forces, we can create a powerful combination that allows us to build both 3D models and user interfaces.
Table of Contents:
Web View
Unity is a popular platform for building games and interactive experiences, but it also has many features that make it an ideal choice for other types of applications. One such feature is Web View, which allows you to display web content within your Unity application.
Web View can be used to create dynamic user interfaces that can be updated in real-time. For example, if you have a news app built with Unity, you could use Web View to display the latest headlines from your website or blog. This would allow users to stay up-to-date on the latest news without having to leave the app.
Another benefit of using Web View is that it allows you to easily integrate web-based functionality into your Unity project. If there’s a particular API or service that you need access to in order to build your application, you can simply use Web View to embed that functionality directly into your project.
Web View works by creating a new view within your Unity application where web content can be displayed. You can control this view just like any other element in your scene by adjusting its position and size or adding animations and special effects.
Layered Architecture
The layered architecture pattern is a software design pattern that divides the system into layers. Each layer has a specific responsibility and interacts with the layers above and below it. The layers are typically organized in a hierarchical fashion, with the highest layer being the user interface layer and the lowest layer being the data/hardware accelerator layer.
Layer 1: Unity Application
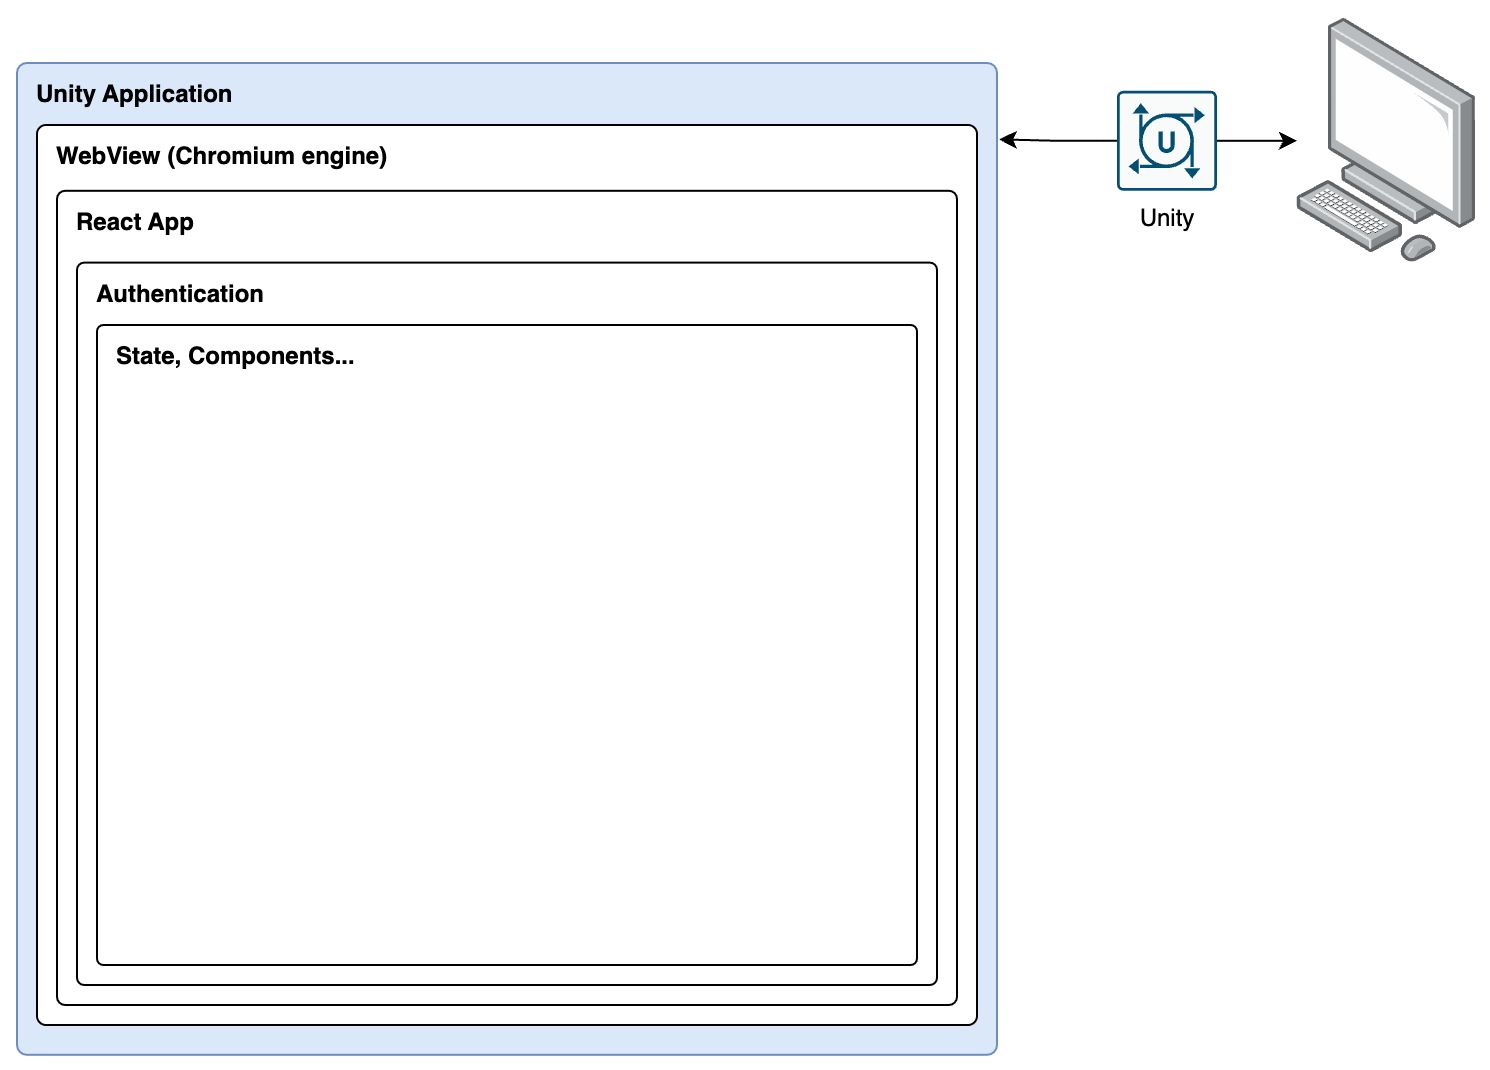
The Unity Application is the bottom layer of the architecture. It’s responsible for all of the 3D rendering capability. The Unity application communicates with the other layers through a set of interfaces, which are defined in the Unity application layer.
This layer deploys Web View where it should expand across the entire screen. It’ll receive events from the React application and update the scene accordingly.
Layer 2: Web View
The Web View layer is responsible for rendering the web content (React application). Since Web View imeplements the Chromium engine it can render any web content. This layer sits inbetween Unity and React and initialises the React application.
Web View should be implemented to be responsive and stetch the full size of the application’s viewport. From Unity’s perspective, Web View’s z-index should be the topmost so that so React can be rendered on top of the Unity application.
Since it’s a Chromium implementation, things like the global window object is available to the React application. This means that the React application can communicate with the Unity application through the window object (more on this will follow).
Layer 3: React Application
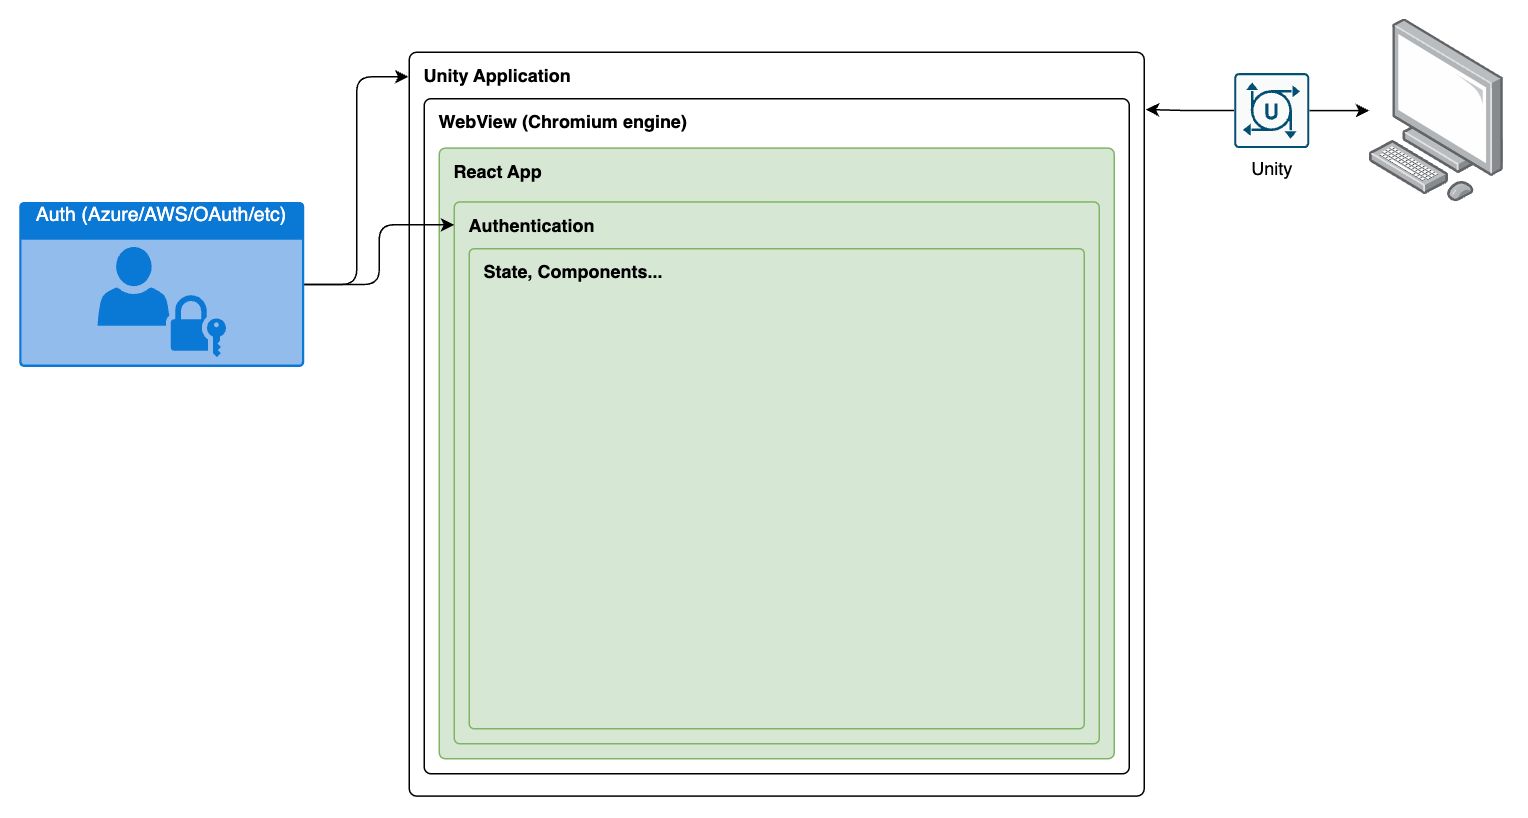
The React application is the top layer of the architecture. It contains all of the business logic and all of the user’s external API access patterns, such as: authentication, fetching contextual menu information, user selections etc. It’s also responsible for rendering the user interface. It’ll receive events from Unity and update the UI accordingly. Likewise, it’ll send events to Unity to update the scene.
Bringing it all together
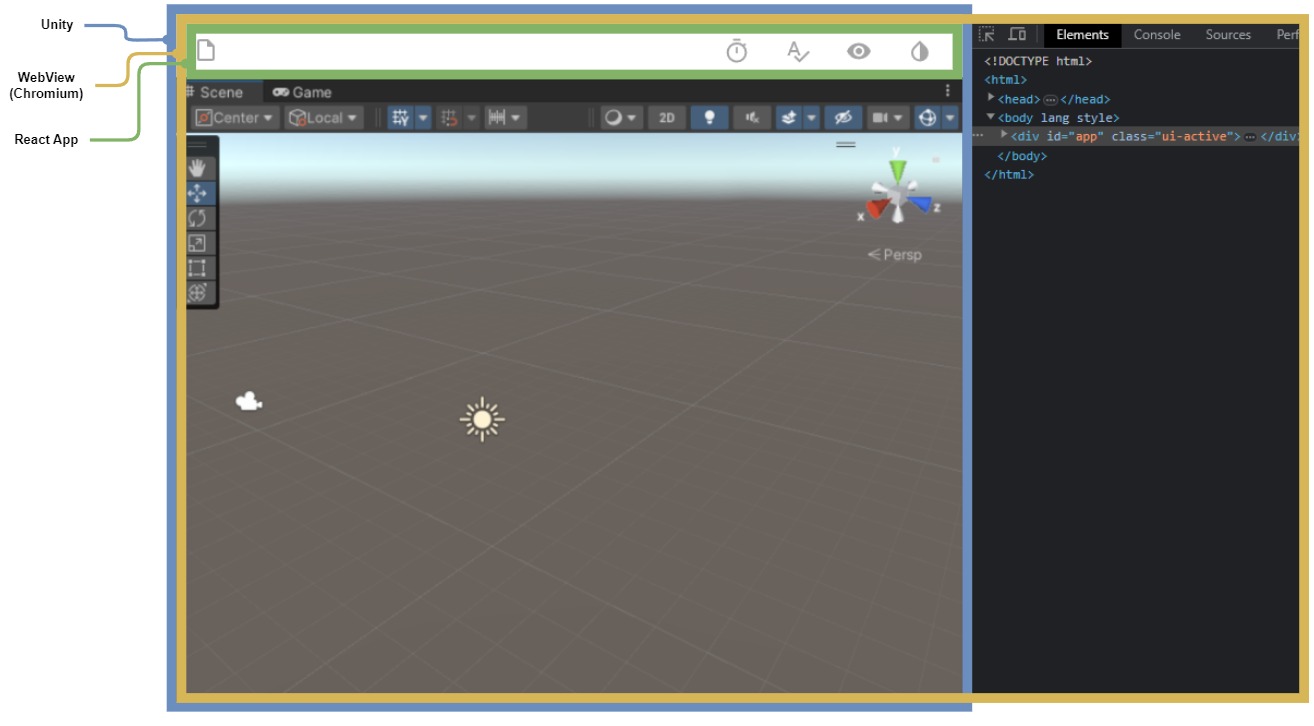
High level view
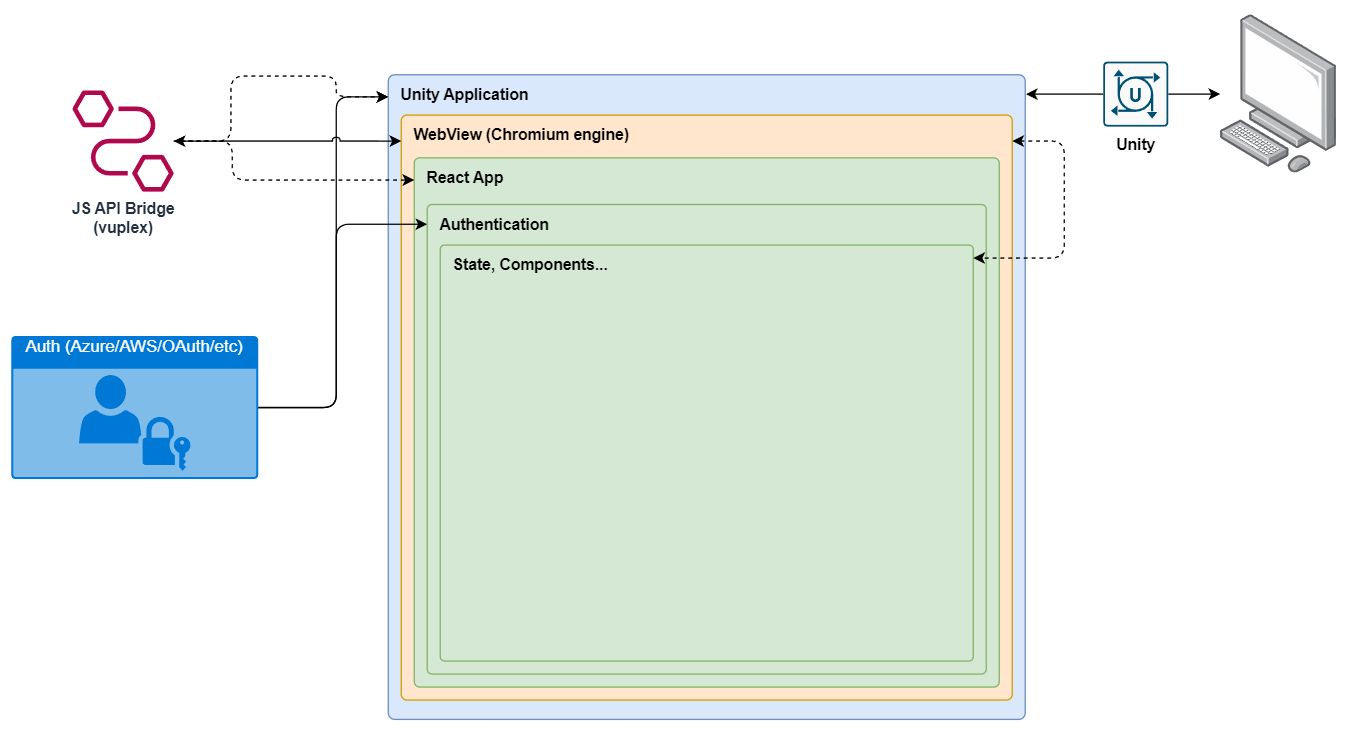
What it looks like in reality
Lifecycle of Events
- Unity is loaded
- Unity initialises Web View
- Web View loads React
- React initialises
- React sets up
vuplexevent handlers - React sends
onLoadevent to Unity - Unity receives
onLoadevent from React - Unity sends
3dModelLoadedevent to React - React receives
3dModelLoadedevent from Unity … - User interacts with React, sending events to Unity
- Unity receives events from React and updates the scene accordingly; and so on.
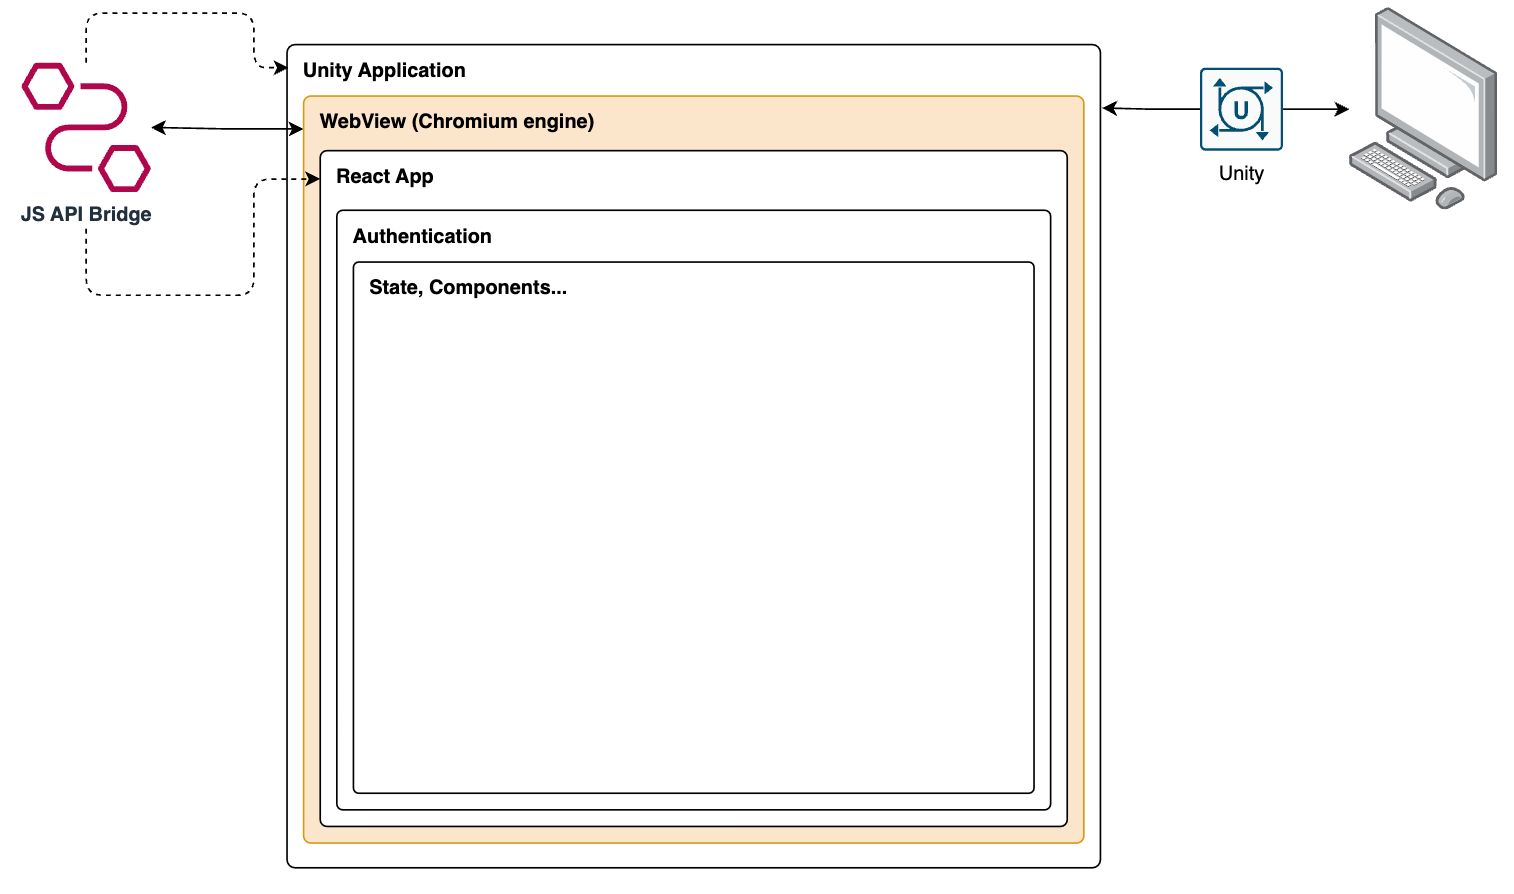
JS API Perspectives
The JS API is a set of interfaces that allow the Unity to communicate with the React and vice-versa.
Unity Perspective
From a Unity perspective, the JS API is a set of interfaces that allow Unity to communicate with React and vice-versa. The JS API is implemented as a set of C# classes that are exposed to the Unity application through a set of interfaces. These interfaces define the methods that can be called by the Unity application and the events that can be sent to the React application.
The Unity layer is responsible for implementing the JS API with a set of predefined events. Each event has a command and optional payload. The command is a string that identifies the event type. The payload is an object that contains additional information about the event.
An example of Unity sending an event to React would look like:
{
  command: '3dModelLoaded',
  payload: {
    name: 'PerthCity',
    radius: 1000
  }
}
An example of Unity receiving an event from React would look like:
{
  command: 'onLoad',
  payload: {
    version: '1.0.0',
    state: 'ready'
  }
}
Notice how both are being represented as JSON objects. This is because the JS API is designed to be used with JSON. This makes it easy for developers to work with the JS API since they don’t have to worry about converting data types or serializing/deserializing objects (custom data types still need to be catered for during deserialization of JSON -> Unity).
React Perspective
Like Unity’s implementation, React also needs to implement its own event handlers to be able to both send and receive events to and from Unity. Web View suggest to implement vuplex on the window scope. Vuplex is a JS API bridge that allows Unity and React to communicate with each other.
3D WebView has a built-in window.vuplex.postMessage() JavaScript API that you can use to send messages from JavaScript to C#. Since it’s built into the browser, you don’t need to include any 3rd party scripts in the page in order to utilize it. The following example illustrates how to use this JavaScript API in a page script or in a script executed via ExecuteJavaScript():
Following the Unity example of sending an event to let Unity know the React app has initialised, it’ll look like something like this:
const handleOnLoad = () => {
  window.vuplex.postMessage('onLoad', {
    version: '1.0.0',
    state: 'ready'
  });
}
Notice that the window.vuplex object is used to send the message. This is the same object that Unity uses to send messages to React. This means that both Unity and React can communicate with each other through the window.vuplex object (aka JS API bridge).
An example of receiving an event from Unity would be:
window.vuplex.onMessage((event) => {
  switch (event.command) {
    case "3dModelLoaded":
      console.log(event.payload);
      break;
    default:
      break;
  }
});
The onMessage method takes a callback function as an argument. This callback function will be called whenever an event is sent from Unity. The event object contains information about the event such as the command and payload. It’s up to the developer to decide what to do with this information.
Conclusion
Splitting the application into layers allows us to separate concerns and make it easier to maintain and extend the application in the future. It also makes it easier to test each layer individually, which can be useful when debugging issues or adding new features.
The release cycle of the application is also improved because each layer can be released independently. This means that if there’s a bug in one layer, it can be fixed without having to release the entire application.
If you’re interested in learning more about how we can help with your project, please get in touch!
![]()